

This website views at its very best in Firefox web browser, and is not available in a mobile version.
Copyright © All Rights Reserved | Built by Serif Templates


|
|
|
|
|
|
|
Once you've completed that and have saved your XML's you're ready to import your car model. This, of course, requires that we export our car from SketchUp to ASE. After each SketchUp export to ASE a window will pop up telling us what meshes and what text labels (bones & set points) were exported with our model. |
||||
|
|
|
|
|
|
|
This presents very little problem when exporting standard CSO's to ASE but when exporting car models with animated restraints that may include multiple bones and dozens of text labels, often this message window will extend below the bottom of our display and we'll be unable to read all of it. Before blithely clicking on ENTER to select the OK toggle that we can't see we'd want to thoughtfully consider taking on board the information presented in the list of items exported. |
||||
|
|
|
|
|
|
|
This is where a dialog text extraction utility will come in handy. We routinely use Sys Exporter for situations where we need extract and manipulate the data displayed in Microsoft Windows list boxes, combo boxes, text boxes, and dialog boxes. For more about SysExporter and how to use it see our article Park CleanUp & Third- |
||||
|
|
|
|
|
|
|
Once the data in this list has been extracted it can be copied & pasted into the word processor of our choice and alphabetized. Once we've got our data in order we can easily confirm if everything's been exported to ASE before getting further along in the Import process and discovering that some of our bones and meshes are missing or mislabeled while we're in the process of trying to set them all up in the Bones dialog of the Edit Animated Model Settings window. |
||||
|
|
|
|
|
|
|
At some point you'd need to load your animations into the Importer. How to do this has already been covered here in our article Loading Your Animations Into The Importer. |
||||
|
|
|
|
|
|
|
Let's refresh our memory by again reviewing the textures used in this project ... |
||||
|
|
|
|
|
|
|
|
|
|
|
|
|
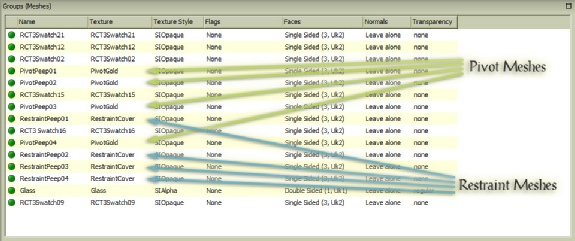
... and a brief look at the Importer's Meshes dialog as set up for our car. |
||||
|
|
|
|
|
|
|
|
|
|
|
|
|
|
||||
|
|
|
|
|
|
|
In the Importer's Edit Animated Models window we need to set up the effect bones. You'll recall we've labeled our Parent bone so that we know at a glance that that bone serves as the main pivot point for any other corresponding bones. The only thing we need to do with the parent bone is assign it a mesh. We don't need to do anything with the Parent set points. |
||||
|
|
|
|
|
|
|
|
|
|
|
|
|
By now in this process our Parent bones are all go but our child bones, the part of the restraint arrangements that we want to rotate, are still free agents and need to be properly set up so they'll rotate in the places that we need them to. Well do that in this way: |
||||
|
|
|
|
|
|
|
|
1 |
The first thing we'll do is identify the Parent bone to each of our Child bones and then assign our Child Bones a mesh. |
||
|
|
2 |
In the individual Bone dialog that displays note there is a Position 1 and a Position 2 field at the right hand side. We need to enable Position 2, so right there below where it says Position 2, left mouse click inside the empty toggle to enable that. Now press the Position 2 E button to bring up the Position 2 Matrix Editor dialog. |
||
|
|
3 |
Up at the top right where it says (Custom) select your Child bone from the drop- |
||
|
|
4 |
This is the place in the importer where Child Bones are locked onto our Parent bone and we've begun this process by translating the position of the bone. Press OK to leave this dialog. |
||
|
|
5 |
Back at the individual Bone dialog we need to get the Importer to re- |
||
|
|
6 |
A message will display asking if we really want to replace all the bone's matrix entries. As our goal is to get our Child bone assigned to our Parent bone select Yes. |
||
|
|
7 |
Again returned to the individual Bone dialog, along the bottom of the Position 1 field we can see the new co- |
||
|
|
8 |
Finally, the Child bone set points need to be linked to the Parent bone. |
||
|
|
|
|
|
|
|
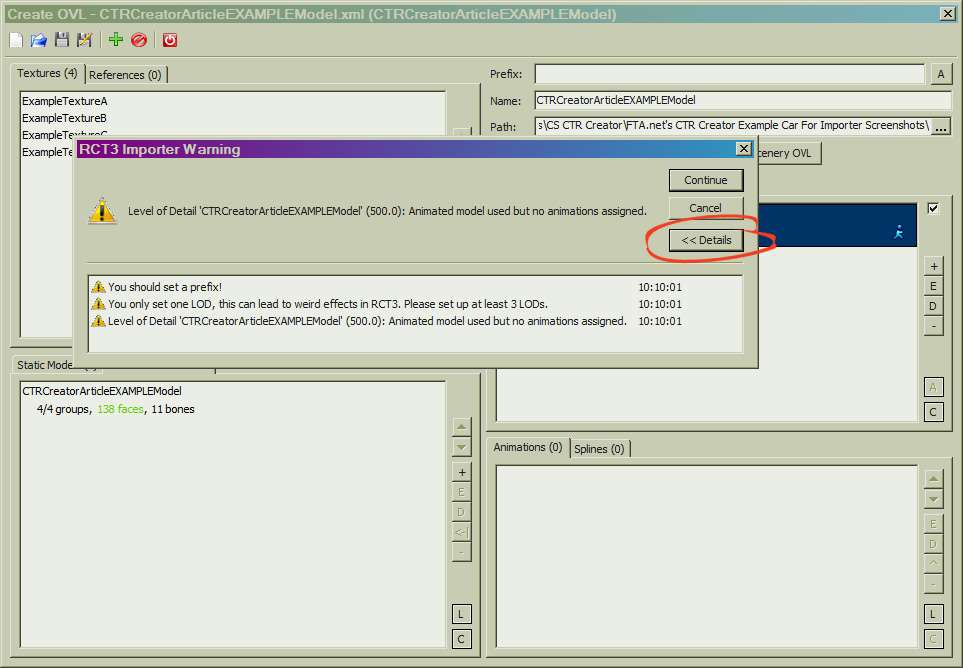
It's a good idea to take a careful look over the details of any caution message displayed by the Importer when including animations with custom content. Down at the bottom right of any warning message there's a Details toggle that will display a dialog of warnings thrown out by the Importer. Here you should not see any warnings about your XML's and if you do now is the time to backtrack and correct them. |
||||
|
|
|
|
|
|
|
|
||||
|
Next we show you what your Effect Points dialog should look like when you're done sorting all your entries. This image more than anything else will justify the reasoning behind the detailed names we've given our bones, set points, and bone meshes. Again this method of giving specific names to the bones, set points, and meshes will stand you in good stead when you create cars with large numbers of seats. |
||||
|
|
|
|
|
|
|
|
||||
|
In the BahnDaten_ for this car we've used one of SwissCheese's stations and we've adjusted the station height because we want our guests to take a step down to get into the cars. |
||||
|
|
|
|
|
|
|
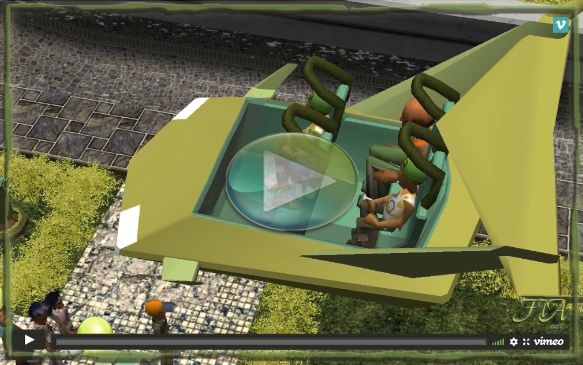
And here's a video of our restraints operating in the game. Although we'd decided which of SwissCheese's stations to use by then, at the time we took this video we hadn't yet made the station CSO. |
||||
|
|
|
|
|
|
|
|
|
|
|
|
|
Drag the above toggle to a convenient place on your screen. |
|
|
|
|
The Ultimate CTR Creator


| Viewing Full-Sized Images On This Website |
| Effective Park Design: The Best Start For Your Park, Page 2 |
| Master Maps And Guest AI, Page 2 |
| Guest Generation, Park Capacity, And Peep Factory, Page 2 |
| Setting Up And Switching Your Park Entrance, Page 2 |
| Theming Our Stalls & Facilities, Page 2 |
| Our VIP Blue Book, Page 2 |
| Our VIP Blue Book, Page 3 |
| Our VIP Blue Book, Page 4: Spot The VIP's |
| Volitionist's RCT3 Animal Care Guide, Page 2 |
| Volitionist's RCT3 Animal Care Guide, Page 3 |
| Volitionist's RCT3 Animal Care Guide, Page 4 |
| How To Unlock All Campaign Scenarios, Page 2 |
| The Care And Feeding of Custom Downloads, Page 2 |
| The Care And Feeding of Custom Downloads, Page 3 |
| The Care And Feeding of Custom Downloads, Page 4 |
| RCT3 Cheats & Unlockables, Page 2 |
| Options.txt Flags, Page 2 |
| Options.txt Flags, Page 3 |
| RCT3 Keyboard & Mouse Controls: Advanced |
| RCT3 Keyboard & Mouse Controls: Freelook |
| RCT3 Keyboard & Mouse Controls: Isometric |
| RCT3 Keyboard & Mouse Controls: Normal |
| Guests Departing The Station But Not Returning |
| Guests Knocked Over |
| People Spilling Down Stairs |
| Lost Staff |
| ReAppearing Invisible Vendors |
| Park File Thumbnails |
| RCT3 Freezes |
| Earthquakes and Plumbing |
| The Importer |
| SketchUp |
| Reviewing RCT3’s History, Page 2 |
| Chris Sawyer, Page 2 |
| Showcase!: Fall 2020, TNS Pool Paths & TNS Pool Terrain, Page 2 |
| Showcase!: Fall 2020, TNS Pool Paths & TNS Pool Terrain, Page 3 |
| Showcase!: Fall 2020, TNS Pool Paths & TNS Pool Terrain, Page 4 |
| Showcase: Spring 2019 - DasMatze's Fences & Railings, Page 2 |
| Showcase: Spring 2019 - DasMatze's Fences & Railings, Page 3 |
| Showcase: Spring 2019 - DasMatze's Fences & Railings, Page 4 |
| Showcase: Fall 2018 - L-33/Lee, Page 2 |
| Showcase: Fall 2018 - L-33/Lee, Page 3 |
| Showcase: Fall 2018 - L-33/Lee, Page 4 |
| Showcase: Spring 2018 - Spez Mies Wall Set, Page 2 |
| Showcase: Winter 2017 - Mr. Sion's Tiki Bar, Page 2 |
| Showcase: Fall 2017 - Polynesian Panic, Page 2 |
| Hall of Fame: Belgabor's Invisible Doodads |
| Hall of Fame: Spice's Invisible Pool CS |
| Hall of Fame: GTT's Hedge Maze |
| Hall of Fame: GTT's Glas Labyrinth |
| Hall of Fame: Joey's Park CleanUp |
| Hall of Fame: GTT's Hedge Maze, Page 2 |
| My Adventures In SketchUp |
| CSO's I Have Imported |
| TexMod Customized Add-Ins |
| My Parks |
| Videos |
| Screenshots |
| Advertisement Land |
| Intrepid: A Revolution In Design |
| Structure And Ride Supports Set |
| CSO Study: GTT’s Hedge Maze |
| Wonderland Themed Playing Card Railings |
| Architectural Chess |
| Mini Chess |
| Planters 'n' Fountains Set |
| Intrepid: A Revolution In Design, Page 2 |
| Intrepid: A Revolution In Design, Page 3 |
| Intrepid: A Revolution In Design, Page 4 |
| Structure And Ride Supports Set, Page 2 |
| Café, Update 1 |
| Path Add-Ons, Update 1 |
| Planters And Pool Fencing, Page 2 |
| Landscaping And Park Grounds, Page 2 |
| Walls, Tunnels, And Fences, Page 2 |
| Decking, Stairs, And Balustrades Set, Page 2 |
| Decking, Stairs, And Balustrades Set, Page 3 |
| CFR & CTR CSO's, Page 2 |
| CFR & CTR CSO's, Page 3 |
| CFR & CTR CSO's, Update 1, Page 1 |
| CFR & CTR CSO's, Update 1, Page 2 |
| TexMod Tutorial |
| My TexMod Skies |
| TexMod MakeOvers For My Park |
| TexMod MakeOvers For My Park, Page 2 |
| Vanguard West |
| Vanguard West: Financial Report |
| Hillside On The Lake |
| Hillside On The Lake: Financial Summary |
| A Woodland Clearing |
| Vanguard West, Page 2 |
| Vanguard West, Page 3 |
| Vanguard West, Page 4 |
| Vanguard West, Page 5 |
| Vanguard West, Page 6 |
| Vanguard West: Financial Report, Page 2 |
| Vanguard West: Financial Report, Page 3 |
| Hillside On The Lake, Page 2 |
| Hillside On The Lake, Page 3 |
| Hillside On The Lake, Page 4 |
| Hillside On The Lake, Page 5 |
| Hillside On The Lake, Page 6 |
| Hillside On The Lake: Financial Summary, Page 2 |
| Hillside On The Lake: Financial Summary, Page 3 |
| Hillside On The Lake: Financial Summary, Page 4 |
| Hillside On The Lake: Financial Summary, Page 5 |
| A Woodland Clearing, Page 2 |
| Screenshots, Page 2 |
| Screenshots, Page 3 |
| Screenshots, Page 4 |
| Screenshots, Page 5 |
| Advertisement Land, Page 2 |
| Collaborations - Custom Content |
| Collaborations - Parks |
| L-33's POE Building 4 Set |
| RCT2 Wonderland Themed CSO's |
| The Crüe |
| L-33's POE Building 4 Set, Page 2 |
| RCT2 Wonderland Themed CSO's, Page 2 |
| POE Building 4 Set Presentation Park |
| POE Building 4 Set Presentation Park, Page 2 |
| POE Building 4 Set Presentation Park, Page 3 |
| POE Building 4 Set Presentation Park, Page 4 |
| POE Building 4 Set Presentation Park, Page 5 |
| How To Use Park CleanUp, Page 2 |
| How To Use Park CleanUp, Page 3 |
| Park Admission, Ride Pricing, And EI&N, Page 2 |
| Maximizing Your Small Park's Real Estate, Page 2 |
| Park Shuttle Configurations, Page 2 |
| Elevated Coaster Stations And Access Options, Page 2 |
| Suspended Pools And Guest Access Options, Page 2 |
| Terrain Painting - Artistry In Landscaping, Page 2 |
| Terrain Painting - Artistry In Landscaping, Page 3 |
| How To Build A Great Park, Page 2 |
| Optimize Your System And Enhance Your Gaming Experience, Page 2 |
| Custom Scenery |
| TexMod ReTexture Packs |
| Miscellaneous |
| Parks, Scenarios, & Sandboxes |
| Coasters, Rides, & Attractions |
| Structure And Ride Supports - Original Concrete |
| Structure And Ride Supports - Hewn Brick |
| RCT2 Wonderland Themed Set |
| RCT2 Revival Crüe Chess |
| FTA's Invisible Stall With Invisible Vendor |
| RCT3 Launch Screen Slideshow Template |
| Dark Ride Enclosure Toppers |


